Monday, December 14, 2009

Cheese of the Month- Ardrahan


I’ve fallen off the cheese wagon lately. Chalk it up to my move to Brooklyn and away from my apprenticeship at the inimitable Sprout Creek Farm. Though I live among a plethora of some of the country’s best cheese shops, I’ve been a very bad and lazy taste-tester, existing in an existential state of cheese limbo.

However, I recently got my paws on a choice piece of Ardrahan, a wash-rind, semi-soft cheese hailing from a small family farm in Cork, Ireland. Those of you who know my cheese sensibilities won’t be surprised that I’m featuring this particular cheese on this particular blog.

Ardrahan proved itself a complex cheese, worthy of the awards it has garnered. Splitting open the golden, saffron-hued exterior reveals an ocre-colored flesh that’s both firm and springy. Like some of my other stinky cheese favorites, Ardrahan possesses a somewhat sticky rind and a meaty interior that’s delivers a subtlety pungent barnyard aroma and an earthy, mushroomy flavor, which becomes slightly tangy as it ages. On the tongue, the mouthful is buttery, nutty, salty and slightly chalky.

Ardrahan is made from pasteurized cow’s milk and vegetarian rennet, hand-made in small batches by the Burns family on their Kanturk, County Cork farm.

Monday, December 7, 2009

Grape Focaccia


I’m always pleasantly surprised to sit down at a restaurant and find a bread basket filled with salty, warm focaccia instead of the ubiquitous hunks of nondescript bread that fill the stomach while leaving the soul empty. I can think of nothing better to start a meal than this soft and spongy Italian specialty, its moon-like craters filled with hot pools of olive oil, coated in an inviting layer of crusty salt and crispy herbs.

And with the holidays upon us, I begin a treasure hunt for inspired recipes and flavor combinations, familiar and homey, but with a twist. This focaccia recipe is utterly simple to assemble, yet the interplay of flavors- sweet and fruity grapes and sea salt, tangy shallots and earthy rosemary- give way to synergistic bread, a marriage of aromas and tastes more dynamic than the sum of its individual parts.

The flavor combination is traditionally Italian. I used both red and green grapes as that is what I had in stock. If using sea salt, be sparse- a little goes a long way.

Requiring only premade pizza dough, there is no need to slave away with packets of yeast and no need to massage the dough. This recipe is like a holiday recipe in itself: simplicity gift-wrapped and served-up in the form of piping hot, springy bread that packs a serious flavor punch.

Grape Focaccia

1 pound pizza dough, preferably from your local pizzeria
2 tablespoons extra-virgin olive oil
1 medium shallot, thinly sliced
1 tablespoon fresh rosemary leaves or 2 teaspoons dried rosemary
1 cup red grapes (or 1/2 cup red grapes and 1/2 cup green grapes)
Coarse sea salt or kosher salt to taste
Freshly ground black pepper to taste
Honey for drizzling

1. Preheat the oven to 400 degrees. Roll the pizza dough into a rectangle on sheet of parchment paper or a silpat. Place the dough and parchment paper (or silpat) on a baking sheet.

2. Brush the dough with the olive oil and sprinkle with salt, garlic, shallot and rosemary. Spread the grapes evenly on dough and push slightly into the dough. Drizzle honey and black pepper to taste.

3. Bake about 25 minutes or until golden.

Monday, November 30, 2009

Blini


I had been conducting research on Jewish gangsters and their noshing habits. Believe it or not, they eat, just like us. They don’t inject themselves with a mercury-based liquid metal to gain mental and physical powers over the layman. Nor do they eat a solid diet of bullets and other gangster-tested, mobster-approved paraphernalia.

My gangster research was myopically focused on finding a recipe suitable for contribution to a satire magazine for their crime-themed issue, which ended up being an exercise in futility professionally, but very interesting on personal and academic levels.

I needed to find a solid dish, beloved by the Jewish mob, and recreate it in my own culinary style. In order to do my research, I spoke with notable New York historian Dr. Phil Schoenberg, a NYU PhD best known for his historic tours of New York City. I also spoke with a retired NYPD detective who, before his exit from the force, worked on Russian organized crime cases as an undercover and an investigator.

We spoke of the Kosher Mafia and their preferred restaurants. Never men to shy away from the hyperbolic lifestyle, many could be seen frequenting the kitschy, over-the-top banquet halls in Brooklyn’s Brighton Beach, such as the famed Rasputin. Others like Bugsy Siegel and Meyer Leven preferred cuisine like their bubbies made, holing up inside the mystical Ratner’s vegetarian restaurant, a kosher dairy enclave that served up to 1,200 per diem in their heyday. And still others went the way of the Jewish deli, specifically Katz’s. Maybe they sent a salami to their loved one in the army? On second thought, they probably used the salami as a club.

Since my research took me back to the Brighton Beach area of Brooklyn, I started to crave Russian specialties and decided to whip up a batch of Thomas Keller’s mini blini. Though he’s not exactly a Russian cook, Chef Keller’s blini are light, airy, creamy and as opulent as the Russian nightclubs in Brighton Beach. The savory, silver dollar-sized pancakes are made from Yukon Gold potatoes and as Keller notes, the waxy potatoes allow the batter to absorb more cream. Garnishes can be as simple or lavish as you wish, ranging from a dab of rich butter, a tomato confit like Keller uses, caviar, or smoked salmon and a dollop of crème fraîche, the latter being my personal favorite.

Blini
Adapted from The French Laundry Cookbook

1 pound Yukon Gold potatoes
2 tablespoons all-purpose flour
2 to 3 tablespoons crème fraîche, at room temperature
2 large eggs
1 large egg yolk
Kosher salt and freshly ground white pepper

1. Place the potatoes in a saucepan with cold water to cover by at least 2 inches. Bring to a boil over high heat, reduce the heat, and simmer until the potatoes are thoroughly cooked and tender.

2. Peel the warm potatoes and press them through a potato ricer. Immediately weigh out 9 ounces of puréed potatoes and place them in a medium metal bowl. Working quickly, whisk the flour into the warm potatoes, then whisk in 2 tablespoons crème fraîche. Add 1 egg, whisking until the batter is smooth, add the second egg, and then add the yolk.

3. Hold the whisk with some of the batter over the bowl. The batter should fall in a thick stream but hold its shape when it hits the batter in the bowl. If it is too thick, add a little more ore me fraîche. Season to taste with salt and white pepper.

5. Heat an electric griddle to 350 degrees. If you do not have a griddle, heat a large nonstick skillet over medium-low heat. Spoon between 1 and 1-1/2 teaspoons of batter onto the griddle or skillet for each pancake. Cook until the bottoms are browned, 1 to 2 minutes. Then flip them to cook the second side, about 1 minute. The blini should be evenly browned with a small ring of white around the edges. Transfer the blini to a small baking sheet and keep warm while you make the remaining blini, wiping the skillet with a paper towel between batches. Serve the blini as soon as possible.

Yield: About 3 dozen small blini.

Wednesday, October 21, 2009

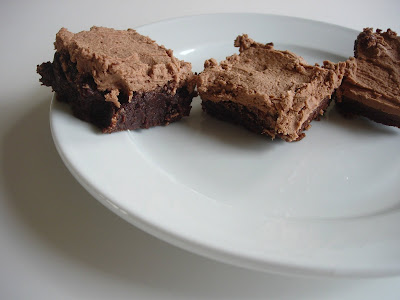
Frosted Brownies


After a several month hiatus from food blogging, I return with glory. And nothing exemplifies glory like my mom’s luscious brownies.

My mother makes the world’s best brownies. Her brownies could save the world: peace in the Middle East, global warming, America’s healthcare crisis, and even Rush Limbaugh’s drug problem. Debonair men have been seen obsequiously begging to lick the batter-coated spoon. Genteel women throw manners to the wind, picking the crumbs from the baking dish (or the floor). My mom’s brownies are a coup in the world of baking.

Everyone who knows my family knows that my husband gets killers sugar cravings. His sweet tooth is uncanny, something of ancient myths. I’ve never seen a man single handedly wipe out a pint of ooey-goey ice cream with such fervor, or inhale a dozen chocolate cookies in seemingly one superhuman breath. Mike’s appetite for sugar destruction is bordering on otherworldly. If he could, he would live and thrive in Willy Wonka’s candy factory, living happily amongst the sugary tea cup and larger than life candy trees.

However, this is reality and many store bought cookies contain suspicious toxins and bizarre unpronounceable ingredients. If he’s going to single handedly decimate the world’s sugar supply, I’d like him to do it with homemade baked goods. Furthermore, my mom’s brownies never fail to feed his monstrous sugar craving, yet another coup in the world of baking.

The brownies are densely rich, fudgy and deeply chocolately. The brownie itself is not overly sweet, yet we do something not commonly seen in the world of brownies: we frost them with a rich, slightly cocoa-infused butter-based frosting. The combination is sinful: smooth, moist, rich cake slathered in velvety ripple of extravagance. I’ve also added a pinch of cayenne which is more or less tasteless in the final product, but really deepens the chocolatey richness.

* Let it be noted that my mom uses the Silver Palate Cookbook’s recipe as a skeletal template for her own brownies. However, she’s managed to make them her own. I’ve had other people’s versions of the Silver Palate brownie recipe and nothing comes close to my mom’s.


Brownies:
1/2 pound salted butter, unsweetened
4 ounces unsweetened baker’s chocolate
1/2 cup unbleached flour
1 1/2 cups sugar
4 eggs
1 1/2 teaspoons vanilla extract
Pinch of salt
Pinch cayenne (optional)
Butter for greasing the pan (or nonstick spray)

Chocolate frosting:
1/2 cup of butter, softened
3-4 cups confectionary sugar
1-2 tablespoons unsweetened cocoa powder
1-2 tablespoons whole milk
Vanilla extract to taste (optional)

1. Preheat oven to 350 degrees. Grease a 10x10 baking pan with butter or non-stick spray.
Melt chocolate and butter in a double boiler over high heat until melted (you can also do this in the microwave).

2. While the chocolate and butter mixture melts, beat eggs and sugar until thick and add salt and vanilla. Mix until well combined.

3. Once the chocolate and butter melt, pour immediately into egg mixture and fold quickly so as not to cook the eggs. Sift flour and fold into the batter until well blended.

4. Poor batter into the greased pan and bake for 25 minutes. Make sure not to overbake--the edges will be firm and the center will appear unset.

5. Cool brownies in pan for 20-30 minutes before frosting.

6. To make the frosting: beat butter with a mixer at medium speed and slowly add sugar, beating well. Add cocoa and continue mixing until well combined, scraping down the sides of the bowl as necessary. Beat in milk and vanilla until the icing reaches a spreadable consistency.

Yield: About 12 brownies.

Monday, August 10, 2009

Parmesan Crisps


In the summer months, I prefer recipes that require little forethought and little time. However, there’s no need to sacrifice flavor and substance at the hands of simplicity. In August, we often feast on cold cucumber soup with aromatic lemon, ambrosial mint and tangy buttermilk, fresh pasta tossed with ripe heirloom tomatoes, spicy basil and a light splash of sweet aged balsamic or a summer salad of fresh, crisp spinach and honeyed strawberries. Some recipes are so effortless, clean and restrained that utilizing a bevy of ingredients seems excessive.

Recently I found myself in need for a little extra something to accompany bowls of chilled truffle-oil infused pea soup. I contemplated slices of toasted baguette, but have used garlicky toast points ad nauseam to accompany soups, salads and the like and was a little weary of dipping something so hearty into the light and delicate soup. I wanted to step it up, celebrate our evening with a Thomas Keller-inspired meal, and something a little more sophisticated and airy. As I flipped the pages of The French Laundry Cookbook, I remembered Italian frico, or wafer-thin cheese crisps, from my days as a cook.

Keller’s recipe for Parmigiano-Reggiano crisps is effortless. I have a hard time calling it a recipe as it only requires one ingredient: the parmesan. I have made frico many times before, sometimes throwing in herbs and spices, or a little flour for texture. Sometimes I fry them in a cast iron skillet, rather than bake them. For Keller’s parmesan crisps, all you need is a cheese grater, a silpat (or parchment paper) and a cookie sheet, and you’re in business.

The act of baking grated cheese yields an intensified nutty flavor, a crackling texture and the most beautiful, cobweb-esque structure. Like crystallized snowflakes, no two frico are exactly the same, the cheese melting artistically into fragile, edible doilies.

Frico are perfect served alongside your favorite meal or as a crunchy snack with a glass of red wine.

Parmesan Crisps

1/2 cup finely grated Parmigiano-Reggiano (from a moist piece of cheese)

1. Preheat the oven to 325 degrees. Line a baking sheet with a Silpat (or parchment paper). Sprinkle about 2 teaspoons of the cheese in one corner of the Silpat. Use your fingers to spread the cheese into a 2-inch circle. Repeat with the remaining cheese; you should have about 12 rounds.

2. Bake for 8-10 minutes, or until they are golden brown. Use a small spatula to transfer them to paper towels. They will be soft when they are removed but will stiffen as they cool. Store the crisps in an airtight container for up to 2 days.

Yield: Makes about twelve 2-inch crisps.

Tuesday, July 28, 2009

I scream, you scream- Crème Fraîche Ice Cream with Nutella Swirls


The summer weather hasn’t yet reached its peak, but the humidity has been nestling in my pores and showering my skin with an impenetrable layer of ick. There’s little to cool a body down without plunging head first into a crispy-cold pool or setting up a cot in the icy frozen isle of the supermarket.

Ice cream is one of the few foods that brings reprieve from the heat, whether it be from your block’s Mister Softee-in-residence or a fancy gelateria. Ice cream tickles the tongue and penetrates body heat like the ephemeral sting of a slap in the face.

Since my stove and oven get little air time during the summer months, I need to get my kitchen fix in other ways. My ice cream maker is one lucky appliance, doing double duty in bringing existential satisfaction and physical relief.

Though I often prefer sorbets and fruit-based ices on hot days, I went with crème fraîche and buttermilk as my primary ingredients, rendering an ice cream that was slightly tart, delicately tangy and subtly sweet. Building on the richness of the silken crème fraîche, I used four eggs to create a custard base, though the finished product was less full bodied and more clean and crisp.

Of course, being the fun loving youngsters that we are, we added Nutella swirls to give the otherwise sophisticated recipe a cheerful facelift, yielding a sleek dessert with a playful twist.


Crème Fraîche Ice Cream with Nutella Swirls
1 cup crème fraîche
1 1/2 cup heavy cream
5 ounces can evaporated milk
1 1/2 cups buttermilk
1 1/4 cups superfine sugar
4 large egg yolks
1 vanilla bean pod
Pinch of salt

1. Place the heavy cream with the sugar, salt and vanilla pod, sliced lengthwise, over medium-high heat until the milk just begins to foam. Remove from heat, extract the vanilla bean and scrape the seeds from the pod with a knife. Mix the seeds back into the cream. Turn off the heat and let stand for 10 minutes.

2. In a separate bowl, whisk the egg yolks. Slowly add the warm cream into the egg yolks, whisking constantly. Return the mixture to medium heat and stir constantly with a rubber spatula, until the mixture thickens and coats the spatula.

3. In a bowl, mix crème fraiche, evaporated milk and buttermilk. Pour into blender and whip until well combined and very smooth, scraping down the sides.

4. Pass custard through a strainer into a clean bowl. Chill both custard and crème fraiche mixture until cold, about an hour.

5. Combine custard and crème fraiche and mix well. Transfer the cold mixture to the container of ice cream machine and process according to manufacturer’s instructions.

6. Layer about one third of the ice cream into a storage container. Gently swirl spoonfuls of Nutella over the ice cream and repeat with another layer. Top the second layer of Nutella with remaining ice cream and store in the freezer prior to serving.

Friday, July 17, 2009

Summery Deviled Eggs


An egg is a thing of beauty: simple in form yet representative of life, birth and sustenance. And when it comes to eggs, I like to eat around. More or less any and all egg preparations are fair game in my book of gastronomical love. While the egg can be a vehicle for some of the loftiest soufflés and custards, sometimes love comes in the form of easily accessible, simple pleasures.

Deviled eggs tend to be my go-to appetizer and snack when all else fails and I’m feeling spontaneous. That isn’t to say that I don’t hold deviled eggs in high esteem. Nothing can be further from the truth. But I always have spicy Dijon and creamy mayonnaise at my finger tips and it takes little more to whip up a batch of deviled eggs, fleshing them out with whatever sundry ingredients I happen to have available.

Like the stand-alone egg itself, deviled eggs are so malleable that one is likely to unleash the beast of versatility on the lemon-colored yolks. You can add anything from smoked paprika or Tabasco for a fiery red spiciness for which the deviled egg is named. A helping of chives, dill or tarragon herbs can also do the trick, if you are in the mood for a more of a fresh, summery flavor. Or else go both ways. Add heat in the form of cayenne and a touch of freshly minced garlic, a squirt of acidic lemon and your herb of choice. And don’t say I didn’t warn you. These puppies are highly addictive!

Summery Deviled Eggs

6 hard boiled-free range eggs
1/4 cup good mayo
1/2 teaspoon extra virgin olive oil
1 1/2 teaspoons Dijon mustard
Pinch cayenne pepper
1/2 teaspoon fresh squeezed lemon juice
1/4 teaspoon fresh Garlic, minced to a paste
Chopped tarragon to taste
Salt and pepper to taste

1. Put eggs in a saucepan and cover with cold water. Bring to a boil and then cover the pan and turn off the heat. Let the eggs sit in the water bath for 20 minutes.

2. Remove eggs from pan and cool them under cold running water. Crack and peel and cut in half lengthwise. Scoop out yolks with a spoon and into a bowl. Using the back of a fork, smash eggs yolks until no large pieces remain.

3. Add mayonnaise, olive oil and mustard to the yolks and mash until the mixture is smooth. Add cayenne, lemon juice, garlic, salt and pepper to the paste and continue to mix until well combined. Add chopped tarragon to taste and mix thoroughly.

4. Spoon mixture into the eggs whites or pipe in with a pastry bag and sprinkle with a little more chopped tarragon.

Yield: 12 deviled eggs.

Tuesday, June 23, 2009

Demel’s Amadeus Cookies


During my college sojourn in Italy, my friends and I travelled to Vienna for a long weekend that turned out to be one of the most poetic times of my life. My memories of our brief but poignant stay in Vienna feel culled from a mystical dreamscape.

Regardless of reality, my mind’s eye views a shimmering indigo Danube (not muddy and murky), ruby red cobblestone streets (not crowded with clueless tourists), luxe palaces, old world charm and enchanted sophistication (memories of the late night bar fights have faded).

The memory of our rustic (and let’s be honest, somewhat soiled) hotel room has evanesced, leaving only pristine, pearly sheets, lush, down-filled comforters, a charming yet exposed shower, and a gasp-inducing view (which probably didn’t even exist). In my mind, Mozart’s beautiful music wafted through the air as we sipped strong coffee and sampled buttercream-coated, meringue-piped and custard-filled cakes, chocolate-glazed pastries and marzipan-filled confections.

Recently Saveur Magazine published an article on the Demel, the famous Austrian confectioner that, ten years later, I still hold in the highest esteem. I ascertain that my memory of Demel is not caricatural. I recall obscene cases of layer cakes, pastries, buttery cookies, apricot jam filled chocolate Sachertortes, flaky strudel, dainty petit fours and endless coffee cakes. I recall white, starched tablecloths, baroque art lining the walls and a majestic air of formality tingeing the air.

The magazine features recipes for Demel’s chocolate truffle cake, marbled coffee cake, Russian punch cake and Amadeus cookies, a buttery sandwich wedged together with Kirschwasser spiked almond/pasticcio paste and dipped into velvety chocolate.

The sumptuous cookies well represent the grand and luxurious Demel. Visually, they are gorgeous: two golden cookies delicately fastened together with neon green paste, half coated in a dark, silken chocolate. They also taste pretty insane: the liquor spiked paste nestled between crisp, buttery wafers, all playing off the dark, slightly bitter chocolate; not too sweet, but without a doubt, decadently rich.


For the cookies:
1 3⁄4 cups flour
12 tablespoons unsalted butter, softened
3⁄4 cup confectioners' sugar
2 egg yolks
1⁄2 teaspoon fine salt

For the filling:
1⁄2 cup shelled and unsalted pistachios
1 tablespoon sugar
3 1⁄2 ounces almond paste, at room temperature, chopped
2 tablespoons cherry liqueur, preferably kirsch
1⁄2 teaspoon vanilla extract
For the glaze:
1⁄2 cup sugar
3 tablespoons light corn syrup
4 ounces semisweet chocolate, preferably 54%, roughly chopped

1. Make the cookie dough: In a bowl, beat 1⁄2 cup flour, butter, and confectioners' sugar with a handheld mixer on medium speed until pale and fluffy, 1-2 minutes. Add yolks one at a time, beating until smooth after each addition. Add salt and remaining flour; beat to make a dough. Halve dough, flatten into 2 disks, and wrap each with plastic wrap. Refrigerate dough for 1 hour.

2. Make the filling: Heat oven to 325 degrees. In the bowl of a food processor, process the pistachios with the sugar until finely ground. Add almond paste and process until combined. Add the kirsch and vanilla and process until combined; set filling aside.

3. Transfer 1 dough disk to a lightly floured surface and roll with a floured rolling pin to a 1⁄8-inch thickness. Using a 1 3⁄4-inch round cookie cutter, cut out 24 cookies. Repeat with remaining dough disk. (Combine and reroll scraps to make 48 cookies in all.) Place cookies 1-inch apart on 2 parchment paper-lined baking sheets and bake, rotating pans halfway through, until cookies are pale golden, about 20 minutes. Let cool.

4. Meanwhile, make the glaze: Bring sugar, corn syrup, and 3 tbsp. water to a boil in a 1-quart saucepan over high heat. Remove from the heat, add chocolate, and swirl pan to coat the chocolate with the sugar mixture. Let sit without stirring to allow the chocolate to melt, about 5 minutes. Slowly stir the chocolate with a rubber spatula until smooth; set aside to let cool slightly.

5. Spoon about 1 teaspoon of the filling onto 24 cookies and top with remaining cookies. Gently press cookies together to sandwich them. Dip half of each cookie into the chocolate glaze. Transfer to a rack and let the glaze solidify.

Yield: Makes 24 cookies.

Thursday, June 18, 2009

Raw Sweet Corn and Cashew Chowder


I’ve been feeling strange lately; inexplicably so. Nothing is wrong, per se, but I’m off.

And for once, I am at a loss for words to describe my condition (and I’m rarely at a loss for words!). Is it general malaise? Have a group of angry aliens snuck into my bedroom while I slumber and administered a probe? Has a Star Trek ear bug wormed its way into my system, shedding its exoskeleton in my stomach? Do I have a tapeworm? Is it simply the “jumping out of one’s own skin” syndrome?

I digress. I feel strange.

I need a quick cure and obviously a hard and fast dose of penicillin will not suffice. I’ve never tried any sort of master cleanse and I refuse. I do not care to buy packs of unmarked powders from a Yoda-style guru online and I refuse to drink that odd, unappealing and seemingly dangerous lemon juice/cayenne concoction. Anyhow, I’m not interested in starvation. But I do need to detox, whether my turmoil is physical or of the existential breed.

In preparation for our move to Brooklyn, I have been going through stacks of old food magazines and clipping inspiring recipes for my recipe book. I revisited the article “Simply Delicious Raw-Food Recipes” profiling raw-food enthusiast Ani Phyo who creates healthful and flavorful dishes using fresh, uncooked ingredients. She stays clear of a preachy, holier-than-thou stance on the subject. Her goal is to inspire others to “cook” and enjoy raw-foods recipes as well as make the lifestyle more accessible to the layman.

Upon reading Phyo’s recipes, I knew right away that eating raw would be the cure for my malaise. (And no, I’m not converting to a raw lifestyle! Who do you think we’re talking about here?!)

I decided to eat all raw, vegan foods for two days (and then continue eating as many fruits, vegetables and grains for the rest of the week). This means no cooking anything, no processed or cooked foods. All food consumed will be organic, uncooked, unprocessed and for me, vegan (though many raw foodists do eat honey and therefore are not considered vegan). My goal was to boost my energy and cleanse my system while opening the vortex of my mind to a totally different lifestyle.

I initially went into this experiment with skepticism. I had never had a raw foods meal that I fully enjoyed and although Phyo’s recipes appeared expertly crafted, I doubted their ability to satisfy my cravings while leaving me both satiated and spiritually content.

While I could never adhere to this lifestyle for a multitude of reasons (I believe cooking enhances flavor, kills germs and even enhances the nutritional value of a lot of foods), I was pleasantly surprised by Phyo’s recipes. Of the recipes on her website, we tried her corn and cashew chowder with cilantro and black pepper, the zucchini “pasta” was raw marinara, the fuzzy navel orange and pecan smoothie, the raw cacao “milkshake” and the apricot pudding. Everything was fresh and bursting with nuanced flavor.

Spring and summer are a particularly wonderful time to enjoy raw recipes as fresh produce reaches its peak and eating raw can definitely connect a person to the dynamic vitality of a fruit or vegetable.

Phyo’s chowder is a perfect early summer soup, taking advantage of easily accessible sweet yellow corn. The combination of corn and cashews seems so natural after tasting the soup. The sweetness of the corn plays so nicely off the earthiness of the nuts and when whirled together, you get a really creamy concoction. The recipe requires a hefty six tablespoons of olive oil so make sure to use a very good Extra Virgin Olive Oil as the flavor hits right up front.

Although we have a high speed blender, my soup was slightly grainy. I might suggest straining it through a China Cap if you have one handy or soaking the cashews in lukewarm water for 1-2 hours, yielding a more velvety texture.

The chowder literally took ten minutes to prepare, not including chucking my corn, which I did at the grocery store. I cannot recommend this soup enough. It is perfect for a light, healthy dinner or as part of a summer picnic in the park.

Raw Sweet Corn Chowder with Cashews
Adapted from Ani Phyo

3 1/4 cups fresh yellow sweet corn, shucked and kernels removed
2 cups water
1/2 cup raw cashews, soaked for up to 2 hours, drained
4-6 tablespoons extra-virgin olive oil
1 small garlic clove
2 teaspoons kosher salt, or to taste
2 teaspoons of chopped fresh cilantro, or to taste
Black pepper to taste

In a blender, combine 2 1/4 cups of the corn with the water, cashews, olive oil, garlic and salt and puree until smooth. Taste for seasoning. Refrigerate if desired for a colder soup.

Pour the soup into bowls. Garnish with the remaining 1 cup of corn kernels, the cilantro, a sprinkle of pepper, and any other garnish of choice.

Yield: Makes 4 servings.

Thursday, June 11, 2009

Macaroons, Two Ways


This year’s Passover has already matriculated, yet my unadulterated love for the iconic macaroon perseveres.

Macaroons have become the hallmark finish to the Passover feast, leavened with silken egg whites rather than the taboo flour that’s temporarily outlawed by observant Jews.

Whether you prefer almond or coconut macaroons is an age-old debate, though many traditionalists argue that almond macaroons are the only sacrosanct version of the cookie.

Though I obsess over everything and anything touched by almonds, there’s something sublimely knockout about Mark Bittman’s coconut macaroons with caramelized sugar, custardy egg whites and textured coconut flakes. Like a perfect almond macaroon, they unfold in a symphony of sensations: moist on the tongue, sweet to the taste and chewy to the teeth.

Meanwhile, Cooks Illustrated almond macaroons have a gossamer thin, crisp shell with a pillowy, yet chewy center, slightly reminiscent of elegant French macaroons; earthy like almonds themselves, yet sweet as if lovingly caressed with honey.

As the macaroons bake, you will notice the air tinged with an ambient perfume of sugary sweetness, a therapeutic and relaxing aroma that coddles the mind and stirs the stomach.

Both versions of the cookie are refined, yet comfortably nourishing and familiar.

Mark Bittman’s Coconut Macaroons

1 cup sugar
3 cups shredded unsweetened coconut
3 egg whites, lightly beaten
1 teaspoon vanilla extract
Pinch salt
Method

1. Heat the oven to 350 degrees. Combine all ingredients in a large bowl and mix well with a rubber spatula or your hands.

2. Use a non-stick baking sheet, or line a baking sheet with parchment paper. To make the pyramids, wet your hands and scoop out a rounded tablespoon of the mixture into the palm of one hand. Using your other hand, press in gently on both sides of the mixture, bringing the macaroon to a point. Continue pressing with your thumb and forefinger on both sides until you have an even shape. For cubes, start as you would for the pyramids, then gently press equally on all sides, turning the macaroon to square off each side. You can use a butter knife to gently smooth the sides of the pyramids and cubes if you like. For balls, roll the mixture between your palms gently until round.

3. Place each macaroon about an inch apart on the baking sheet. Bake until light brown, about 15 minutes. Remove the baking sheet and cool on a rack for at least 30 minutes before eating. These keep well in a covered container for up to 3 days.

Yield: Makes 2 dozen cookies.

Cooks Illustrated Almond Macaroons

7 ounces almond paste or 7 ounces blanched almonds
6 ounces blanched almond (silvered or whole)
1 1/4 cups sugar (regular or vanilla)
3 egg whites from 3 large eggs
1 tablespoons Amaretto (optional)
1 teaspoon almond extract

1. Preheat oven to 325 degrees. Cover two cookie sheets with parchment paper and set aside.

2. Place almonds into the bowl of a food processor and process until roughly chopped. Add the sugar and continue to process until the almonds are finely ground. Crumble in the almond paste (if using) and continue to process until the paste is pulverized and you have a fairly uniform mixture. If you are not using almond paste, process until the almonds are fine and crumbly but not powdery, about 1 minute to 90 seconds.

3. Add the egg whites, extract, and Amaretto and continue to process until the dough is smooth and begins to form into a ball at the edge of the processor blades. Remove from the food processor and allow mixture to stand for 20 minutes.

4. Drop level tablespoons of the mixture onto your prepared parchment paper leaving about 1 1/2 inches of space between each cookie. For an even prettier cookie, gently roll the dough into a ball.

5. Bake for 20-25 minute, rotating the cookie sheets top to bottom and side to side during the baking process. The cookies should be golden on top but should not be over baked as they will have a tendency to harden.

6. Remove cookies from the oven and allow to cool completely on the parchment paper. To make removal easier, scrape the cookie off with a table knife or thin spatula to reduce the chance of tearing. Once cooled the cookies can be stored air tight for up to 4 days or frozen for 1-3 months.

Yield: Makes about 3 dozen cookies.

Tuesday, June 2, 2009

Gluten Free Cheddar Crackers


Coping with food allergies or intestinal diseases seems to be par for the course in today’s environment. With toxins lacing the food we eat, compounded with the noxious air we breathe, it is no surprise that our bodies react in extreme and bothersome ways. You hear more cases of nut allergies, lactose intolerance, IBS, Celiac, and wheat and soy allergies than ever before.

New eating needs necessitate the demand for newfangled cooking.

Having recently come across the book Healing Foods by Sandra Ramacher, I was extremely surprised to find such interesting and versatile recipes geared towards those who experience digestive diseases. All her recipes are grain free, gluten free and sugar free in addition to being simple, gourmet, inspired and layered with flavor.

Ramacher’s cheddar cheese crisps are one of the best salty, cheesy, crunchy snacks on the planet. They are comprised simply of almond flour, a frequently used substitute for wheat flour, cheddar cheese, cayenne pepper, baking soda and water. I left out the suggested thyme as I thought it might detract from the cheesy, spicy boldness with too much earthiness. The taste, compounded with the fact that it is gluten free, make it a foolproof snack with a zesty bite and crackling texture.

Ramacher’s book proves that dietary changes need not be arduous and painful. Sacrificing flavor and quality proves unnecessary with carefully written, elegant, thoughtful recipes.

Cheddar Crisps, adapted from Sandra Ramacher

1 cup almond flour, processed in food processor until flour is finely ground
1 cup sharp cheddar, grated
1/2 teaspoon baking soda
1/4 teaspoon cayenne
2 1/2 to 3 tablespoons cold water

1. Preheat oven to 275 degrees. Line 2 baking trays with parchment paper.

2. Mix almond flour, cheddar, baking soda and cayenne pepper. Add the cold water and mix to form into a flat dough. Cover and place into the refrigerator for 30 minutes.

3. Take the dough from the refrigerator and take about 1 teaspoon of dough and roll each one into a ball and squeeze down with your fingers onto the prepared baking tray. Each cracker should be about 1/8 inch thick and at least 3/4 inch away from the next cracker. Bake in oven for about 25 minutes OR until edges start to brown. Be very careful to monitor your crackers. You do not want them to overbrown during this stage. The crackers still need to look pale in the center.

4. Turn the oven down to 200 degrees. Take the trays out of the oven and let cool for 5 minutes. Turn each cracker over and put the trays back into the oven. Bake for another 30 minutes, turn the oven off and let the crackers sit in the oven until the oven has cooled down.

5. Take the trays out of the oven and let cool completely. Crackers should be slightly browned, but still pale. It is important not to brown beyond a faint golden hue, as the crackers will not taste good.

Store in airtight container, between kitchen paper.

Makes 20 crackers.

Thursday, April 2, 2009

No-Knead Bread


I am one of those home cooks that is constantly at odds with yeast. I love baking bread, don’t get me wrong, but it seems to be a thankless and everlasting exercise in futility. My yeast never blooms, my dough never rises, and I never wind up with fluffy, airy loaves of bread. Rather, I’m an expert at creating hard chunks of flour-based rocks that sink like lead blocks.

In my world, baking bread is the cause of most of the violence in my household. I occasionally take out my aggression on puff pastry or pie crust, but I’ve been known to punch the daylights out of a piece of unleavened dough, kneading it to a bloody pulp, yielding not a tasty loaf of homespun goodness, but an unrecognizable hunk of shattered hopes and dreams. I’ve even read the Miranda rights to an unbaked pile of dough, hoping to instigate a fair and balanced resolution to crimes beyond my control. Of course, the bread never rose to the occasion and I stealthily disposed of its ashes in my trash.

When I saw Mark Bittman’s article on Speedy No-Knead Bread in the New York Times, I had to take a step back and scratch my head. The yeast doesn’t have to bloom? No starter necessary? Is it possible that bread baking could be…gulp…easy and fool proof? The recipe has become something of a technological phenomenon, spreading like light-speed wildfire through the online community, inspiring droves of home cooks and bakers.

This recipe is indeed so easy that even an evil wizard of apocalyptic and profitless bread baking could do it. Let a simple mixture of yeast, salt, flour and water proof in a bowl for a few hours, yielding wet and sticky dough. Bake, first covered, then uncovered, in a pre-heated cast-iron pot. The result is crunchy, golden crust with a soft, chewy, light interior. The sublimely perfect artisanal loaf has an airy, open texture that’s simultaneously dense, chewy and moist. Never again will bread baking doldrums rule my world!


3 cups bread flour
1 packet ( 1/4 ounce) instant yeast
1 1/2 teaspoons salt
Oil as needed.

1. Combine flour, yeast and salt in a large bowl. Add 1 1/2 cups water and stir until blended; dough will be shaggy. Cover bowl with plastic wrap. Let dough rest about 4 hours at warm room temperature, about 70 degrees.

2. Lightly oil a work surface and place dough on it; fold it over on itself once or twice. Cover loosely with plastic wrap and let rest 30 minutes more.

3. At least a half-hour before dough is ready, heat oven to 450 degrees. Put a 6-to-8-quart heavy covered pot (cast iron, enamel, Pyrex or ceramic) in oven as it heats. When dough is ready, carefully remove pot from oven. Slide your hand under dough and put it into pot, seam side up. Shake pan once or twice if dough is unevenly distributed; it will straighten out as it bakes.

4. Cover with lid and bake 30 minutes, then remove lid and bake another 15 to 30 minutes, until loaf is beautifully browned. Cool on a rack.

Yield: 1 big loaf.

Monday, March 16, 2009

Benton's Bacon


The haunting scent from frying Benton’s Smoky Mountain Country Hams’ artisanal bacon lingers in your house for days, sticks to your clothing like a moth to a flame and infiltrates every fiber of your hair with a hickory smoked aroma. And that’s not a bad thing! In fact, it is really, really remarkable.

Mr. Allan Benton, talented and dedicated owner of Benton’s, told me that one of his customers recently asked him how to remove some of the salty, smoky goodness from his bacon. “Remove flavor from my product? I consider that quite the compliment,” he says.

Benton’s hams are slow cured using salt, brown sugar, and sodium nitrite and aged to perfection, typically 9-10 months. This is a time-honored practice, dating back to the days before refrigeration, when meat preservation was a necessity. Benton insists he isn’t doing anything remarkable by upholding the traditional dry-curing process. “What I’m doing is what my grandparents and most of their neighbors did in their backyard,” says Mr. Benton. “We cure bacon and ham in a 180 year-old smoke house. We do everything exactly the same way.”

Benton has been curing hams since 1973, elevating the process to a magical culinary art form. He makes mouthwatering pork products such as prosciutto, smoked country bacon, aged whole country hams, unsmoked country hams and hickory smoked country hams, all of which have garnered him a reputation as a national treasure, and a favorite among professional chefs across America.


Benton’s bacon is seriously and extremely intense. The meaty, marbled slabs are addictive, with a smoky aroma that is no less intoxicating. The individual strips are thick, with a heavy ratio of fat to meat. Benton suggests undercooking, rather than overcooking the meat, in order to maintain the hickory smoked flavor and for an unctuous mouth-feel, closer to pork belly, rather than the crunchy, lifeless strips of bacon to which we’ve grown accustomed. That ethereal hickory flavor lingers in the back of the throat, a powerful confluence of salt and smoke.

Benton's Smoky Mountain Country Hams
2603 Hwy. 411
Madisonville, TN 37354
423-442-5003
https://bentonshams.com

Wednesday, February 11, 2009

Vietnamese Spring Rolls


I have found that in America, Vietnamese food hasn’t won over the hearts and stomachs of Americans in the same way as the cuisines of China and Japan. With the use of fresh fruits and vegetables, minimal oil, and meat as accent rather than the focal point, the food of Vietnam is one of the healthiest cuisines in the world.

Vietnamese food is earthy and ethereal, a cuisine of sharp contrasts, harmoniously married in delicate flavors; a zen-like balance of fresh herbs, vegetables, light protein and nuanced spices. Complex sweet and sour, salty and spicy flavor profiles are coaxed from fish sauce, rice, lemon grass, sugar, chilis and lime.

Perhaps winter isn’t the most apropos season for light, crispy, summery appetizers, but I make an exception for these mouth-watering, flavor-coma inducing Vietnamese spring rolls. I serve them crispy and hot, along with a tangy raw carrot salad and dipped in a sweet and sour nuoc cham, a condiment as pervasive in Vietnamese cooking as soy sauce is to Chinese cooking.

The original recipe, from Bach Ngo’s The Classic Cuisine of Vietnam, requires deep frying. I prefer to bake them in the oven on a cookie sheet, which eliminates some of the fat content while maintaining the essential otherworldly crunch and tender interior.


Filling:
2 ounces cellophane noodles, soaked in warm water for 20 minutes, then drained and cut into 1-inch pieces
1 pound ground pork
1 large onion, finely chopped
3 garlic large cloves, finely chopped
3 shallots, finely chopped
1 can (7 ounces) jumbo lump crabmeat
1/2 teaspoon freshly ground black pepper

20 sheets dried rice papers (triangle shaped banh trang)
Water
1 tablespoon peanut oil plus more for greasing the baking sheet.

Lightly grease a baking sheet with peanut oil.

Heat 1 teaspoon peanut oil in a pan over medium heat and sautee the onion and shallots until just translucent. Let cool. Combine the filling ingredients, including the cooled onion and shallots, in a bowl and set aside.

Place the rice paper on a flat surface. Using a pastry brush, paint water over the entire surface of each of the pieces; this is to make the brittle papers soft and flexible.

When the wrapper looks soft and transparent, place about 1 tablespoon of filling near the pointed edge. Bend the corner over the filling and roll twice, then fold the sides over and continue to roll into a cylinder. Place spring rolls on the baking sheets, with the open end on the underside to prevent unrolling, while you fill the remaining rolls.

Place the rolls in the oven, directly on the oven rack, without preheating (They can be crowded together while baking so that you can get many onto 1 rack). Turn the oven to 350 degrees and bake them approximately 40 minutes, 20 minutes on each side, until crispy and golden brown.

To serve the spring rolls:
Mix 1 tablespoon of carrot salad into the nuoc cham and serve spring rolls with individual dipping bowls.

Accompaniments for serving:

Nuoc Cham:
2 cloves garlic
1 fresh hot red chili pepper or 2 dried
4 heaping teaspoons granulated sugar
1/4 fresh lime
4 tablespoons fish sauce
5 tablespoons water

Peel the garlic. Split the chili pepper down the center and remove the seeds and membrane. Cut into pieces and put into a mortar, together with the garlic and sugar. Pound into a paste. Squeeze lime juice into the paste, then with a small knife remove the pulp from the lime section and add it as well. Mash this mixture and add the fish sauce and water.

Yields 5/8 cup.

Carrot Salad:
1 carrot
1/2 cup water
1 teaspoon vinegar
Pinch of salt
1 teaspoon granulated sugar

Peel the carrot, then, using your feeler, cut long strips of carrot, trying to get as wide a slice as possible, or shred the carrot in a food processor. Take each strip, roll it up tightly, and then cut into thin strips.

Combine the water, vinegar, salt, and sugar. Add the thin carrot strips to the mixture and marinate for at least 15 minutes, or until ready to use. This can be prepared a day ahead. Before using, always drain and discard the liquid.

Triple recipe to serve as a side dish. Carrot salad is always added to Nuoc Cham when it is served with spring rolls.

Yield 1/3 cup

Thursday, January 22, 2009

Chocolate Sandwich Cookies


Oreo cookies are a time-honored snack long favored by children and big kids-at-heart. There’s no denying that the 97 year-old toothsome snack is not healthy. But that hasn’t stopped cross-generational consumers from snapping up bags upon bags of the historic cookie, making it one of America’s most enduring and beloved treats.

Eating an Oreo has never been a simple act: twisting the cookie open, licking down the creamy center, dipping the crunchy halves into milk until rendered soggy. But the pure, unadulterated joy of Oreo consumption can turn any stone-cold scrooge into a jubilant kid.

Lets face the facts, though. Home baked goods are always a better alternative to the trans fat laden commercial desserts from your local grocer. Rather than devour an entire bag of chemically processed (albeit yummy) goodness, why not make your own?

This recipe for chocolate sandwich cookies is not difficult, but it is certainly tedious, a perfect activity for a blustery, snowed-in day. Although time consuming, the finished product is well worth the effort.

The cookies are sublime, like a homemade version of the Oreo: crunchy, wafer-thin, slightly flaky and subtly salty cocoa-infused biscuits wedged together by a sugary, creamy white chocolate ganache. The effort is certainly a worthy indulgence. These “Oreos” are a grown-up, sumptuously mature reworking of the childhood classic.

For dough:
2 cups all-purpose flour
1/2 cup unsweetened Dutch-process cocoa powder
1/2 teaspoon baking powder
1/2 teaspoon salt
2 sticks (1/2 pound) unsalted butter, softened
3/4 cup sugar
1 large egg yolk
1 teaspoon pure vanilla extract

For ganache:
1/2 cup heavy cream
1 1/2 tablespoons light corn syrup
3/4 pound fine-quality white chocolate, melted
2 tablespoons unsalted butter, softened
2 teaspoons pure vanilla extract

Equipment: a 1 3/4-inch fluted round cookie cutter

Make dough:
Whisk together flour, cocoa powder, baking powder, and salt.

Beat butter and sugar with an electric mixer until pale and fluffy, then beat in yolk and vanilla. At low speed, mix in flour mixture in 3 batches just until a dough forms. Divide dough in half and form each piece into a 6-inch square, then chill, wrapped in plastic wrap, until firm, 2 to 3 hours.

Make ganache while dough chills:
Bring cream and corn syrup just to a simmer in a small heavy saucepan, then stir into melted chocolate. Stir in butter and vanilla until smooth. Cover surface with parchment paper and chill, stirring occasionally, until very thick, about 30 minutes.

Cut and bake cookies:
Preheat oven to 350°F with rack in middle. Butter 2 large baking sheets.

Roll out 1 piece of dough between sheets of parchment paper into a 14- by 10-inch rectangle (1/8 inch thick). Slide dough in parchment onto a tray and freeze until dough is firm, about 10 minutes. Repeat with remaining dough.

Cut out as many rounds as possible from first chilled square with cutter, reserving and chilling scraps, then quickly transfer cookies to a buttered baking sheet, arranging them 1/2 inch apart. (If dough becomes too soft, return to freezer until firm.)

Sprinkle half of cookies with decorative sugar (if using), then bake cookies until baked through and slightly puffed, 10 to 12 minutes. Cool on sheet on rack 5 minutes, then transfer to rack to cool completely (cookies will crisp as they cool).

Make more cookies with remaining dough and scraps (reroll only once).

Assemble sandwich cookies:
Beat ganache with an electric mixer at high speed just until light and fluffy. Transfer to a sealable plastic bag (snip off 1/8 to 1/4 inch from 1 corner with scissors). Pipe ganache onto flat sides of plain cookies, then top with sugared cookies to make sandwiches. Chill, layered between sheets of parchment, in an airtight container until filling is set, at least 1 hour.

Sandwiched cookies keep, chilled, 4 days.

Makes 3 1/2 dozen cookies.

Tuesday, January 6, 2009

Potatoes Gratin


Potatoes are one of those versatile foods that apply to any season. In summer, potato salad is served cold, coated in a thin layer of crisp mayo or oil and livened up with herbs. In the cooler weather, potatoes beckon to be baked or roasted in their little fall jackets, perfect for a hearty, warming snack. In winter, however, I want something meatier, something heavier, richer and creamier. I want 1000 calorie potatoes! And nothing fits the bill better than potatoes au gratin.

Over the past few years, I have been on an aggressive hunt for a life-changing au gratin recipe. I’ve cooked through the steakhouse cookbooks, the grill and grill accompaniment cookbooks, a few classic cookbooks, an “all things potato” cookbook and just about everything in between. After undertaking dozens of recipes, I was left cold, unsatisfied and carbo-loaded.

With a little help from famed chef Alice Waters’ cookbook “The Art of Simple Food,” I found enough inspiration to create the perfect gratin. Chef Waters’ recipe is incredibly simple, bare-bones and even somewhat healthy: thinly sliced potatoes baked, 3 layers deep, with salt, pepper and milk. It is her post-recipe suggestions that bring the everyday au gratin to heightened levels. She recommends rubbing the pan with garlic to ramp up the flavor, or adding a dash of cheese toward the end of baking to create a flavorful, crispy top layer.

I went full throttle with the casserole, 4 potatoes sliced paper-thin, the layers sprinkled with salt, pepper and cayenne, slathered in a caloric mixture of half & half and heavy cream, a layer of thinly sliced garlic on the bottom, baked off and topped with a crispy, crunchy layer of gruyere. This, my friends, is the ultimate au gratin, garlic flavor infused in every bite, the top browned and crunchy, the bottom golden, the layers perfectly tender, gooey and velvety.

Butter
2 large garlic cloves, thinly sliced
4 potatoes, thinly sliced with a mandolin, about 1/16 inch thick
Salt to taste
Black pepper to taste
Cayenne to taste
1/2 cup heavy cream
1/2 cup half & half
Greyere for sprinkling, grated

Preheat oven to 350 degrees.

Rub a 9x12 inch baking dish with butter until well coated. Layer the bottom of the buttered dish with the sliced garlic.

Make a layer of potato slices on top of the garlic, overlapping them slightly. Sprinkle with salt, pepper and cayenne. Continue to layer the potatoes, seasoning each layer to taste, until the potatoes are used up or until you make 3 layers.

Pour cream and half & half over the potatoes.

Bake potatoes for about 1 hour total. Halfway through the baking, take the gratin dish out of the oven and press the potatoes flat with a spatula to keep the top moist. Sprinkle gruyere over top of potatoes for the last 15 minutes of baking. The gratin is done when the potatoes are soft and the top is golden brown.

Yield: 4 servings.